SIT Process
When the Merchant/PSP is ready to test and integrate into Scan to Pay, a mail will need to be sent to Scan to Pay [email protected] who will then load the merchant/PSP onto the Scan to Pay Test system.
This must include the name that the Merchant/PSP chooses to use as well as the email address of the administrator to access the Scan to Pay portal.
Note: The Administrator will usually be the person responsible for the technical side of the Merchant/PSP’s development.
Once the Merchant/PSP is successfully loaded onto the Test system by the Scan to Pay team – the administrator of the Merchant/PSP will receive an email to access the Scan to Pay Portal. A password will need to be created. Please note this email expires after 24 hours and will need to be reset thereafter.
Once logged on the Merchant/PSP will be able to retrieve your API key as well as set up sub-users and merchant notification details.
If the merchant/PSP is doing a Scan to Pay In App/Lib Lite integration they will need an additional Lib Lite token as part of the In-App integration. To get this token, log on to the Portal as a merchant, then select the drop-down email address and select Lib Lite Tokens. Then, select New API Password. Please note this token is different from the API password that you will use to create codes, etc. using the Scan to Pay APIs.
Once the Merchant is Ready to Test:
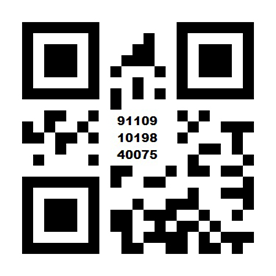
For testing on Test make sure that your app is in Test mode. The Scan to Pay app can be downloaded from the Android and iOS stores. You will need to scan the below code to switch your app between Live and Test.

QR Test
Thereafter, you can use the below for testing your integration when completing a payment after scanning the QR code. This applies to all integrations besides In App/Lib Lite as the SDK for In App sits in the merchant’s app.
Test Card Info:
Add 4 more digits to the card ranges below and they will return the desired response.
These below test cards will test only the below-mentioned scenarios and will only work once you
Scan to Pay application is switched to Test.
Debit Card:
Any 18-digit card starting with 50010001000105 with any bank PIN = 00 response (success)
Any 18-digit card starting with 50010001000101 with any bank PIN = 51 response (insufficient funds)
Any 18-digit card starting with 50010001000103 with any bank PIN = 91 response (issuer or switch
inoperative/bank unavailable)
Credit Card:
Any 18-digit card starting with 50020001000105 with any bank PIN = 00 response (success)
Any 18-digit card starting with 50020001000101 with any bank PIN = 51 response (insufficient funds)
Any 18-digit card starting with 50020001000103 with any bank PIN = 91 response (issuer or switch
inoperative/bank unavailable)
All Other Card Testing:
If you would like to test a scenario where a specific card has different behaviour depending on a certain use case, for example first SecureCode purchase successful but a failed recurring / CNP transaction, then you can initiate a transaction with the amount of ZAR123.xx where xx (the cents of the amount) will be the simulated bank response code. So for example, an amount of R123.51 would result in a simulated bank response of 51 (insufficient funds). Please note that the merchant must be configured to use test mode (debug bank node). Please also note that this works on any card.
Should there be any problem using the above card info for In-App/Lib Lite testing, please contact
[email protected] for assistance.
Updated 3 months ago
